Part 1: Setup & Environment
Outcome: A new bobchestrate-ws project connected to the workshop
watsonx Orchestrate environment.
What we will implement
You will create the participant workspace, Python environment, ADK 2.14.0 installation, Bob workshop configuration, MCP connections, and active watsonx Orchestrate environment used by the later parts.
Everything runs inside Bob IDE
All terminal commands and Command Palette actions in this workshop are performed inside IBM Bob IDE — not in a separate system terminal.
How to open a terminal in Bob IDE (same as VS Code):
- Menu: Terminal → New Terminal
- Keyboard:
Ctrl+`(backtick) on Windows/Linux,Ctrl+`on macOS
The terminal opens at the bottom of the editor, already pointed at your project folder.
How to open the Command Palette:
- macOS:
Cmd+Shift+P - Windows:
Ctrl+Shift+P
The Command Palette is a quick-search bar at the top of Bob IDE where you type a command name and press Enter to run it — you will use it throughout this workshop.
Two different sidebars — you will need both
Bob IDE has a narrow strip of icons down the far-left edge (the Activity Bar). Two of those icons matter here and they are easy to mix up:
- The Extensions icon (four squares) opens the extension marketplace — you use it once, in Step 3, to install the ADK extension.
- The watsonx Orchestrate icon opens the extension's own panel, which contains Explorer, Initialise Workspace, and Environment Manager. This is where Steps 6 and 8 happen.
Clicking the extension's name under Extensions → Installed only opens its description page. It does not contain the buttons you need.
1. Create the participant project
Create a new empty folder called bobchestrate-ws anywhere on your machine.
Do not clone the workshop repository — start from an empty folder.
You can create the folder using any method you prefer:
- Finder (macOS) / File Explorer (Windows): right-click in the location you want and choose New Folder, then name it
bobchestrate-ws. -
Terminal / Command Prompt:
Once the folder exists, open IBM Bob IDE, sign in with your IBM ID, and select File → Open Folder → bobchestrate-ws. Trust the workspace when prompted.
2. Verify prerequisites
Complete Prerequisites, then open a terminal in Bob IDE:
Python must report 3.12.x.
3. Install the ADK extension
- Open the Extensions panel:
Cmd+Shift+Xon macOS orCtrl+Shift+Xon Windows. - Search for and install IBM watsonx Orchestrate ADK.
The extension must be installed before creating the virtual environment so that Bob IDE can detect it during the next step.
4. Create the virtual environment
- Open the Command Palette (
Cmd+Shift+P/Ctrl+Shift+P). - Type Python: Create Environment and press Enter.
- Choose Venv, then select the Python 3.12 interpreter.
- Open a new terminal in Bob IDE and confirm that
(.venv)appears in its prompt.
Terminal fallback
If Python: Create Environment is unavailable, open a terminal in
bobchestrate-ws and create the environment manually. Use the command for
your operating system:
These commands use the Python 3.12 installation verified in Step 1. Then
activate .venv using the platform command below.
If automatic activation fails:
The PowerShell change applies only to the current terminal session.
5. Install ADK 2.14.0 into the virtual environment
Primary: Bob IDE extension
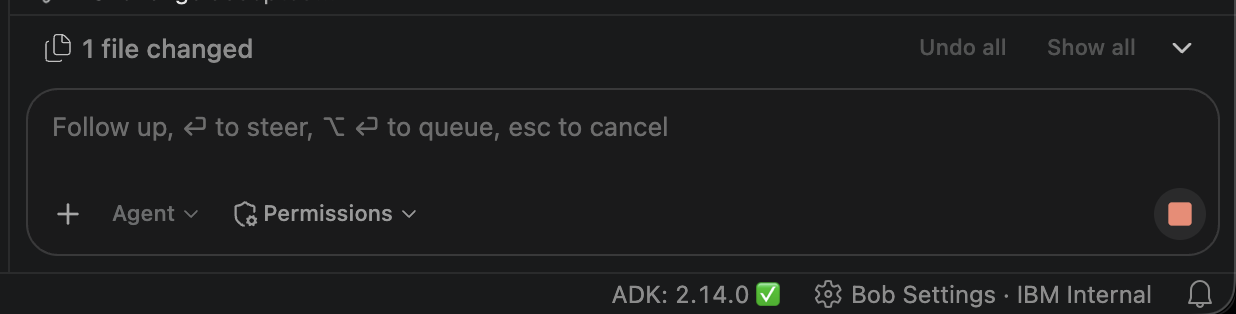
In the Bob IDE status bar — located in the bottom-right corner, next to the
Settings (gear) icon — the ADK extension shows a status indicator. It is red
until the ADK is installed. Click it and choose the option to install the ADK
into the .venv you created in Step 4.
When the install finishes, the indicator turns green and shows the installed version:
Confirm the version in the terminal:
The first line must show ADK Version: 2.14.0.
Backup: install via pip directly into .venv
If the extension button did not work, or the installed version is not 2.14.0,
run the following command from a terminal in bobchestrate-ws. It installs the
correct pinned version directly into .venv:
The command writes directly into .venv, so it works whether or not .venv is
active in your terminal.
Add the evaluation dependencies
Everyone runs this step, including participants for whom the extension button worked.
The optional Agent Evaluations & Red-Teaming module uses orchestrate
evaluations, which needs an extra package that the ADK install does not
include by default. If you used the pip backup above, this package is already
included — skip to the verification step below. If you used the extension
button, run the same pip command now to add it and pin the version:
Now activate .venv using the platform command in Step 4 and verify both results:
The first must report ADK Version: 2.14.0. The second must print a list of
attack plan names. If the second prints No module named 'agentops', your
terminal is using a different Python than .venv — activate .venv and try
again.
Do not run the --upgrade command the ADK suggests
If you ever hit the agentops error, the ADK prints
pip install --upgrade "ibm-watsonx-orchestrate[agentops]". Running that
moves you off 2.14.0 and breaks the workshop. Always install with the
==2.14.0 pin shown above.
6. Initialise the workspace and MCP servers
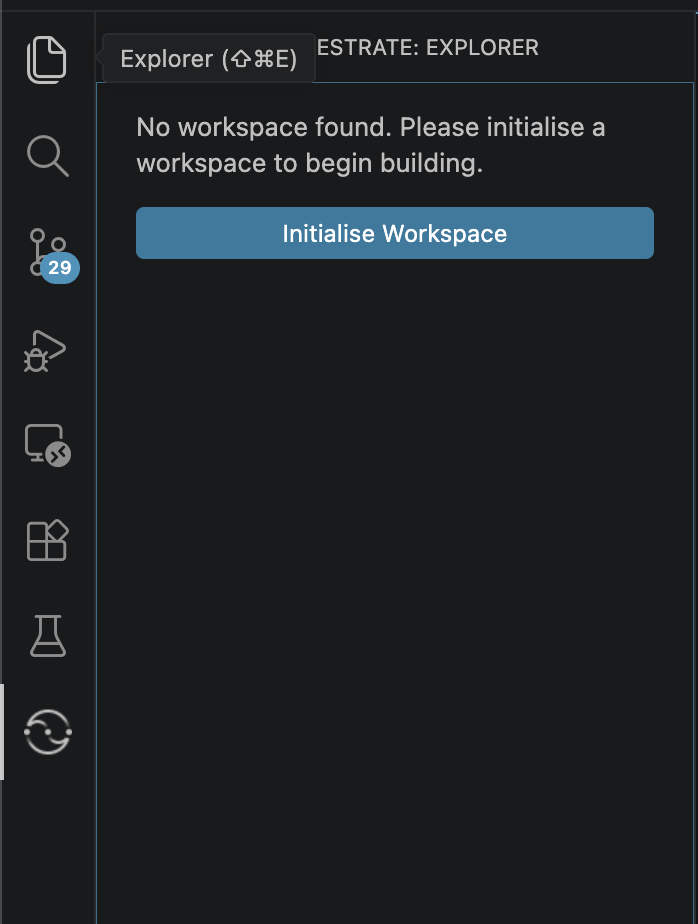
- Click the watsonx Orchestrate icon in the Activity Bar (the strip of icons down the far-left edge). This opens the extension's own panel, titled WATSONX ORCHESTRATE. Do not use Extensions → Installed for this — that page has no buttons.
-
The panel shows "No workspace found. Please initialise a workspace to begin building." Click Initialise Workspace.
-
Open the Command Palette (
Cmd+Shift+Pon macOS /Ctrl+Shift+Pon Windows), type watsonx Orchestrate: Install WXO MCP Servers, and press Enter.
Enter 2.14.0 when the MCP installer asks for a version.
Open Bob Settings (the ⚙️ gear in the bottom-right corner of the window,
next to the ADK indicator — not the VS Code settings gear) and select MCP.
Confirm that both watsonx-orchestrate-adk and watsonx-orchestrate-adk-docs
are green and show Connected. If either server is not green and
connected, try the native HTTP fallback below before asking the instructor.
MCP documentation server not connecting? Use the native HTTP fallback
If watsonx-orchestrate-adk-docs stays red or fails to start, replace its
entry in .bob/mcp.json with the minimal native HTTP transport config and
reload Bob:
"watsonx-orchestrate-adk-docs": {
  "type": "streamable-http",
  "url": "https://developer.watson-orchestrate.ibm.com/mcp"
}
This bypasses mcp-proxy entirely. Confirm the server turns green in
Settings → MCP before continuing. See the
Troubleshooting section for Windows-specific fixes.
Open Bob chat and ask:
Confirm that Bob reports both the ADK and ADK documentation servers. You can
also inspect them from the Command Palette (Cmd+Shift+P / Ctrl+Shift+P)
by typing MCP Servers.
7. Configure Bob for the workshop
The custom mode gives Bob a watsonx Orchestrate role and the tools it needs. The workspace rule applies the workshop's ADK 2.14.0 conventions, safety requirements, and known pitfalls in every Bob mode.
Import the WXO Agent Architect mode
- Click Download the WXO Agent Architect YAML file. Your browser should save it automatically in your Downloads folder. If it opens the YAML instead, right-click the link and choose Save Link As… (or Download Linked File on macOS).
- Open Bob Settings (gear icon ⚙️ in the bottom-right corner) and select Modes.
- Click the import icon (↓ down arrow) and choose the YAML file from your Downloads folder.
- After the import completes, open Bob chat and use the mode selector in the chat input box — the small dropdown on the bottom-left of the box that shows the current mode (for example Agent ⌄). Select WXO Agent Architect from the list.
Install the workspace rule
Download the workshop workspace rule.
Now check what actually landed in your Downloads folder. A normal
left-click saves it as wxo-dev-rule-enhanced.md, but if you used
Save Link As… your browser may have kept the original .txt extension.
Move it from Downloads into .bob/rules/, using the terminal that is open
in your bobchestrate-ws project:
Both commands accept either extension and always leave the file named
wxo-dev-rule-enhanced.md, which is the name Bob looks for. If the command
reports "No such file", the download did not reach your Downloads folder — check
your browser's download bar and repeat the download.
Start a new Bob task after installing the rule.
Checkpoint:
Read the workspace rule in .bob/rules/. Summarize the ADK version, folder,
naming, model, documentation-lookup, tool-preference, and safety conventions you
will follow. Do not create or change files.
Bob should mention ADK 2.14.0, the workshop folders, snake_case,
groq/openai/gpt-oss-120b, the documentation MCP, credential safety, and that
it uses the watsonx-orchestrate-adk MCP server first and falls back to the
orchestrate CLI only when the MCP server cannot do the job.
8. Connect Orchestrate environment
You need the Instance URL and API key you saved in Prerequisites. These are your own values from the environment you provisioned — nobody hands them to you during the workshop. Treat the API key like a password: do not paste it into Bob chat, save it in source files, or commit it.
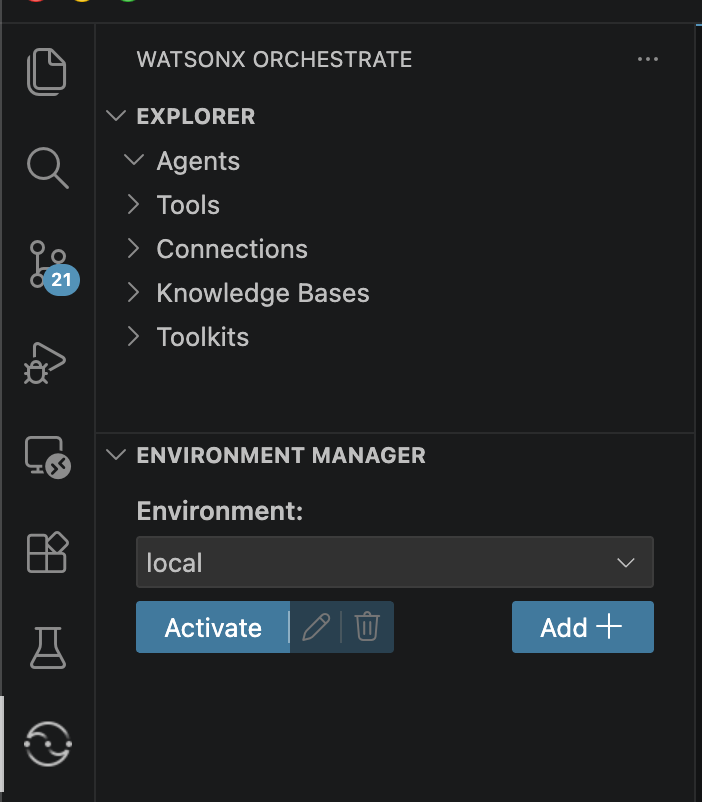
- Click the watsonx Orchestrate icon in the Activity Bar (the same icon you used in Step 6 — not Extensions → Installed).
-
Scroll to the ENVIRONMENT MANAGER section at the bottom of that panel and click Add +.
-
Bob prompts you for two values, one after the other, in an input box at the top of the window:
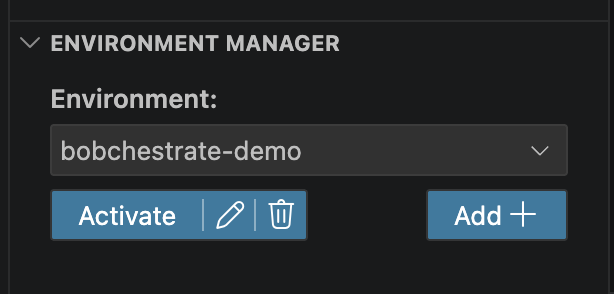
Prompt What to enter Environment name A short name you invent, e.g. bobchestrate-demo. Write it down — later commands ask for it.Instance URL The Instance URL you saved in Prerequisites, pasted whole. -
Your new environment now appears in the Environment: dropdown. Select it, then click Activate.
-
Bob prompts for the API key. Paste it into this prompt only. The characters appear masked.
-
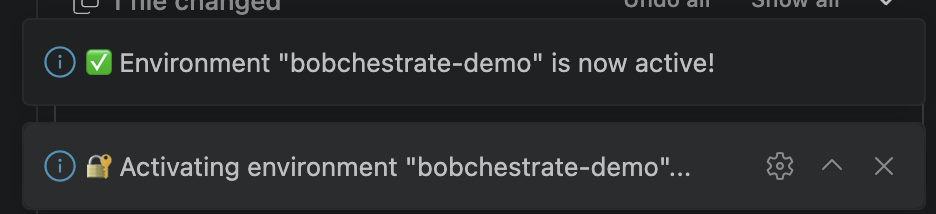
A notification confirms the environment is active:
Verify the connection:
An empty agent list is a successful result.
CLI fallback
orchestrate env add -n <environment-name> -u <instance-url>
orchestrate env activate <environment-name> -a <api-key>
orchestrate agents list
If activation prints a warning, use orchestrate agents list to confirm
authentication before proceeding.
Important
Remote authentication expires periodically. If commands later return an
authentication error, reactivate the environment from Environment Manager
or run orchestrate env activate <environment-name> again.
Setup checkpoint
Ask Bob to perform the non-secret checks:
Inspect this workshop workspace and verify the setup without changing files.
Use the existing .venv. Check the Python and ADK versions, active Orchestrate
environment, expected workspace folders, and access to both Orchestrate MCP
servers. Run safe list or version commands where useful. Summarize anything I
must fix, but do not ask me to paste an API key into chat.
Your project should now contain a structure similar to:
bobchestrate-ws/
├── .venv/
├── .bob/
│   ├── rules/
│   │   └── wxo-dev-rule-enhanced.md
│   ├── custom_modes.yaml
│   └── mcp.json
├── agents/
├── tools/
├── toolkits/
├── connections/
├── models/
├── knowledge-bases/
└── workspace_config.yaml
Empty folders are expected. If you take the optional Agent Evaluations &
Red-Teaming module you will add an evaluation/ folder, and if you take the
optional MCP module you will add files under toolkits/. You do not need to
create them now.
knowledge-bases uses a hyphen
The folder on disk is knowledge-bases, while the setting that points at it
inside workspace_config.yaml is spelled knowledge_bases. That is normal —
check your own workspace_config.yaml and use whichever folder name it
lists.
Before continuing, confirm:
orchestrate --versionreports ADK 2.14.0orchestrate evaluations red-teaming listprints a list of attack namesorchestrate agents listsucceeds- WXO Agent Architect mode is selected
.bob/rules/wxo-dev-rule-enhanced.mdexists- Bob can access the two Orchestrate MCP servers
Stuck?
Copy the tested configuration files for this part from the reference solution, then continue.
Troubleshooting
orchestrate: command not found
Activate .venv using the platform command in Step 4. If the ADK is still
absent, reinstall it from the extension's status indicator.
This is the most common error in every later part too. Each new terminal
must have .venv active — look for (.venv) at the start of the prompt
before running any orchestrate command.
No module named 'agentops'
The evaluation dependencies are missing. Install them with the pinned
command in Step 5. Do not use the
--upgrade form the error message suggests — it moves you off ADK 2.14.0.
Authentication failed
Bob cannot access the MCP servers
Open Settings → MCP and confirm that both
watsonx-orchestrate-adk and watsonx-orchestrate-adk-docs are green and
connected. Restart any stopped server. If either server remains unhealthy,
ask the instructor for help instead of continuing.
MCP documentation server still fails after trying the above fixes
If uvx mcp-proxy continues to fail on any platform, replace the
watsonx-orchestrate-adk-docs entry in .bob/mcp.json with the minimal
native HTTP transport config and reload Bob:
"watsonx-orchestrate-adk-docs": {
  "type": "streamable-http",
  "url": "https://developer.watson-orchestrate.ibm.com/mcp"
}
This bypasses mcp-proxy entirely and lets Bob connect to the documentation
server directly. Confirm the server turns green in Settings → MCP before
continuing.
Windows MCP documentation server fails to start
Use this Windows-only fallback only if the regular MCP setup does not work.
Download the
Windows fallback mcp.json
and replace .bob/mcp.json. Do not use this fallback on macOS.
You must edit the file before reloading Bob. It ships with a placeholder:
Replace the placeholder — quotes included — with the full path to your
bobchestrate-ws folder, for example
C:\\Users\\yourname\\bobchestrate-ws. In Bob IDE you can copy that path by
right-clicking the project folder in the file Explorer and choosing Copy
Path. Leaving the placeholder in place stops the ADK MCP server from
starting. Reload Bob after saving.
A common Windows cause is an incompatible mcp SDK selected by
mcp-proxy. Because its dependency range has no upper bound, the resolver
can select an SDK that causes ImportError: cannot import name
'request_ctx'. Reconfigure the documentation server with the compatible
SDK pin and system certificate support. In PowerShell, use:
uvx --system-certs `
  --with mcp==1.28.0 `
  mcp-proxy `
  --transport streamablehttp `
  https://developer.watson-orchestrate.ibm.com/mcp
If the error is certificate-related, prefer the organization's CA bundle:
Use --verify-ssl false only as a temporary diagnostic workaround, not as
the permanent configuration. The Watsonx endpoint may still be healthy;
this workaround only diagnoses local certificate trust. After updating the
server, return to Settings → MCP and confirm that both servers are green
and connected.